/ Wednesday, 14 June 2017 / No comments / Arduino , How-To , Leapmotion with arduino , Mechatronics , Robotics , Sensors/Modules
How to Integrate LeapMotion Controller with Arduino
Control Leap Motion Technology with Arduino
Hello everyone
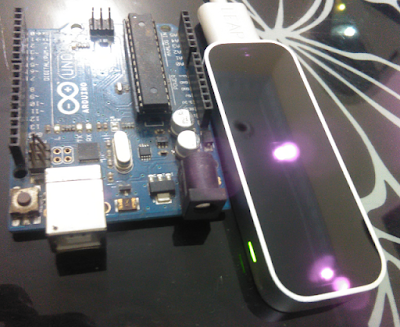
After introduction of Leap Motion Controller i got many requests from my viewers that how to control this 3D hand motion detector device with micro-controllers like Arduino. How to use this leap motion(motion control) device in our projects using Arduino and other microcontrollers. Here in this post i am going to show you that how to "Blink LED" with hand gestures by using Leapmotion controller. How to control electronic devices with leap sensor and how many types of controllers can interface with this motion detecting device.
First of all i will recommend you that when buy leap motion (motion detector) controller first you have to get used to with it properly. you have to know the basic rules and specification of it. And get in touch with how it recognize your hands by tracking the motions of your hands.
Here i am giving you a link for how to starting with gestures recognizing technology
How many types of controllers can Interface with Leap motion controller
The most common issue that arrives in users mind is does the leap motion sensor is only for playing games..? does it only for seeing hand gestures in computers..? My answer is NO. In my point of view This leap motion controller (motion detecting) device can have ability to made something that you can't even imagine. By using this motion control sensor you can make thing that can blow out the others mind. It gives you a way to connect 3D world with real hardware world technology.
When i first buy leap motion controller () i am also confused with it. I was thinking that i waste my money and got stuck with the hell of this device. Because when i download his app there where only i saw the games to play and i was doing my engineering on that time so i was thinking that there app is for programming like others microcontroller (arduino). I stuck there.
But then i think i was wrong !
After alot of searching in google i got a little information's that it can control hardware's when use with microcontroller's like arduino and others.
So i ran to my bag and take out the arduino, both leap motion controller and arduino are connect with my laptop usb pots and then i start to write a program of arduino, ohhhh it's doesn't working then again alot of search i found that there will be some more programming software must be used for controlling leap motion controller (motion detector) technology with arduino.
This is also one of the reason that i write my post what is Leap motion and How its works and got positive response from audience motivate me to wrote about controlling physical devices like DC motors, Servos motors, robots, making projects with leap motion controller (3D hand gestures device) with arduino.
So here i am showing you a list of programming software's for controlling 3D technology with arduino.
- Visual studio.
- Unity 3D.
- Cylon.js
- Processing.
These are the software's you can used with arduino to control motion detector ( gestures recognizing technology ).
Here i am giving you detail about Processing software using with arduino and leapmotion.
Processing with Leapmotion and Arduino
Processing is the software in which we programed in Java language. You can make graphics, 2D, 3D animations, draw objects and much more. Knowledgeable thing is that arduino software is made by using processing language. It is the simplest language and very easy java sketch for beginners. So don't worry about its programming there is a lot of examples to start with it.
How to Download and Start with Processing Software
Go to the site of processing Link download processing software download it. After downloading extract it. Now you got the inside the extracted folder. Open it you got the windows like
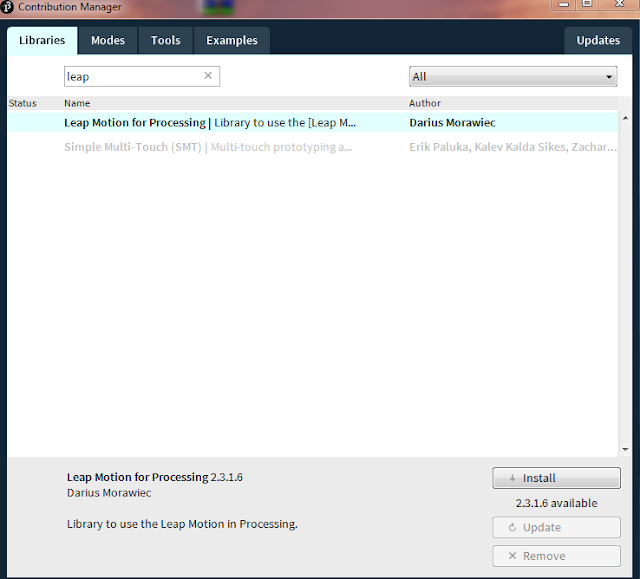
Now for controlling LeapMotion (3D hand gestures technology ) and Arduino with processing we must install libraries of leap motion controller and arduino here below are the the steps for installing libraries.
- Here click Sketch
- click Import library
- Then click Add library
Now you got new window. Write leapmotion in search area you got library of leapmotion for processing click it and install it.
The same processes repeat for arduino library to do this you should write arduino in search instead of leapmotion and install the arduino library.
Now connect arduino and leap motion and check this video for controlling your first real world hardware with leapmotion controller and arduino using processing software and enjoy it. Code is below the video.
" video "
Code for Processing
import processing.serial.*;
import de.voidplus.leapmotion.*;
LeapMotion leap;
Serial myPort;
void setup() {
leap = new LeapMotion(this);
println(Serial.list());
myPort = new Serial(this,Serial.list()[0], 9600);
}
void draw() {
background(0);
for (Hand hand : leap.getHands()) {
pushMatrix();
float handSize = hand.getSphereRadius();
int handSize2 = int(handSize);
myPort.write(handSize2);
println(handSize2);
popMatrix();
}
}
Code for Arduino
int val;
int led = 13; // the pin that the LED is attached to
int brightness = 0; // how bright the LED is
int fadeAmount = 5; // how many points to fade the LED by
// the setup routine runs once when you press reset:
void setup() {
Serial.begin(9600);
pinMode(led, OUTPUT);
}
// the loop routine runs over and over again forever:
void loop() {
if (Serial.available() == '\n') { // Check if there is a new message
val= Serial.read();
// 1st fragment
if (val<60) {
digitalWrite(led,LOW);
}
if (val>60) {
digitalWrite(led,HIGH);
}
}
}
Hope you enjoy this lesson. I am waiting for your precious Feedback about this post .
There will be much more lessons so click Follow button
If you have any query about controlling leapmotion with Arduino kindly tell us so our team can resolve your issue.
Related Posts
Subscribe to:
Post Comments (Atom)


No comments:
Post a Comment