/ Saturday, 18 February 2017 / No comments / Arduino
Control multiple leds with arduino
After led blinking program its time to move a step ahead in programming with multiple leds blinking. To find out new tricks for arduino coding and improving coding sense about arduino sketch.
Multiple leds blinking with arduino:
Here we start with multiple leds blinking with arduino. For understanding this you must have an idea about single led blinking code click http://www.makeitmech.com/2017/02/arduino-led-blinking.html. With multiple leds you can make many interesting projects like led blinking cube, traffic light controller, dancing leds and hundreds of interesting projects you can make with multiple leds blinking. Here we are controlling six leds with arduino. An arduino microcontroller board make it very easy to built multiple leds.Components:
For getting started with arduino we must have to know about the components we use. We must have an Arduino i am using Arduino uno if you have another board Arduino mega or nano or anyone you can use it. The good thing is that the programming will be same.You need 6-resistors. one resistor with each led as shown in circuit diagram.
Here is the list of components :
- Arduino uno.
- 6 led.
- 6 resistors of 220ohm.
- 1 bread board.
- jumper wires.
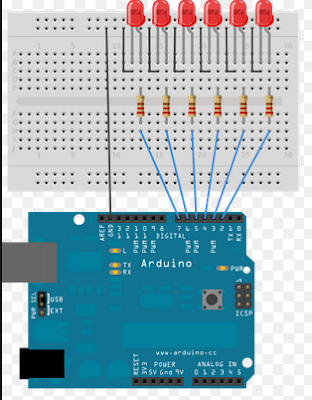
Multiple leds blinking circuit:
Here positive legs of leds connected with resistors and the resistors second end connect with arduino pins 2, 3, 4, 5, 6, 7. and the negative legs connected with Ground
NOTE that resistor is must be connected otherwise your led will blow out because Arduino gives 5 VOLT in every pin and led is working maximum 2.5 or 3 volt if the voltage is more then 2.5 or 3 volt led will blow out.
Multiple blinking leds code:
int led1=2;int led2=3;
int led3=4;
int led4=5;
int led5=6;
int led6=7;
void setup() {
pinMode(led1,OUTPUT);
pinMode(led2,OUTPUT);
pinMode(led3,OUTPUT);
pinMode(led4,OUTPUT);
pinMode(led5,OUTPUT);
pinMode(led6,OUTPUT);
}
void loop() {
digitalWrite(led1,HIGH);
delay(1000);
digitalWrite(led1,LOW);
delay(1000);
digitalWrite(led2,HIGH);
delay(1000);
digitalWrite(led2,LOW);
delay(1000);
digitalWrite(led3,HIGH);
delay(1000);
digitalWrite(led3,LOW);
delay(1000);
digitalWrite(led4,HIGH);
delay(1000);
digitalWrite(led4,LOW);
delay(1000);
digitalWrite(led5,HIGH);
delay(1000);
digitalWrite(led5,LOW);
delay(1000);
digitalWrite(led6,HIGH);
delay(1000);
digitalWrite(led6,LOW);
delay(1000);
}
This programs turn on and off leds one by one after delay of one second. from this code we learn a big loop process. This is the basic multiple leds program with arduino. We can also make led to ON and OFF with different logic like if we want turn ON middle leds first then the first and last leds.
The only change in program is to put your code of led2,3,4,5 from loop to led1 place and led1,led2 in end of loop.
With a little change in program you can make any projects of multiple leds blinking and you can connect many leds with one arduino board.
Hope you learned a lot of tricks with Multiple leds blinking code and able to use many arduino pins for different led blinking.
Related Posts
Subscribe to:
Post Comments (Atom)


No comments:
Post a Comment