/ Wednesday, 15 February 2017 / No comments / Arduino , Mechatronics , Sensors/Modules
Control DC Motors with L293D and Arduino
Control DC Motors with L293D motor driver and Arduino:
In every Project If you want to make Robots, Robotic Vehicles and if you want to lift weights or making line following robots, soccer Robots and obstetrical avoided Robots all you need to first How to control our DC Motors to move Forward, Backward direction.
How to control speed of motors and How to connect it with micro-controller. Here i am using Arduino as micro-controller and for controlling my Motors i used L293D ic which is normally called motor driver (dc motor controller).
How to control speed of motors and How to connect it with micro-controller. Here i am using Arduino as micro-controller and for controlling my Motors i used L293D ic which is normally called motor driver (dc motor controller).
Motor drivers:
There are mainly two motor drivers used to control first is L293D and other is L298 here we are using L293D for L298 motor driver click http://www.makeitmech.com/2017/02/motor-drivers-and-dual-h-bridge-l298.html. .
Reason Why We Use Motor Driver: Why we use motor Driver why we can't connect our DC Motor directly with our Microcontroller (Arduino). The reason Behind this is that in microcontrollers we have very low voltages that deliver very small amount of current in Arduino.
The Arduino is operates at very low voltages 5 to 12 volts. So its also deliver small amount of current and in some devices we need more voltages and current to operate. Dc motors also need more current and Voltages to Operate.
Second main reason is to control the speed and direction of DC motors. If we connect our dc motors directly with our microcontroller we know that motors generates back EMF that can harm our controller so this is also one of the reason to use motor drivers like l293d.
Components:
- 2 dc motors.
- 1 L293d ic (motor driver).
- 1 12 volt battery.
- 20 jumper wires.
L293D IC:
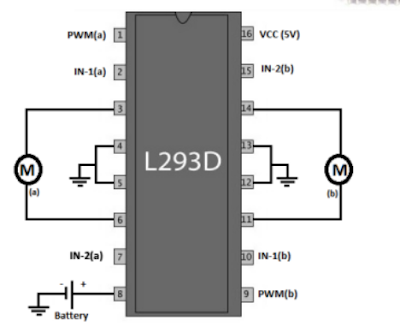
L293D can handle upto 18 volt and 1 ampere. Thats our first need because Arduino can't handle 18 volts and 1 Ampere current. If our motors works more then 5 volts we should connect it with motor driver. L293D have 16 pins in which some for control directions and some for controlling speed of Motors are briefly described below.
Here in one ic of L293D you can connect two Motors. The first 8 pins used for control first DC Motor and the rest pins is used for second DC Motors. Here pin number 1 is for PWM pin of Arduino and it is used for controlling speed of Motor. Pin 2 and 7 is for controlling direction of Motor. Pin 4 and 5 are Ground and pin 3 and 6 is for connection of motor. This process is vice versa for second Motor.
Here is an example code for controlling Direction of motors.
How to control direction using L293D and Arduino:
int IN1 = 4;int IN2 = 5;
void setup() {
Serial.begin(9600);
pinMode(IN1 ,OUTPUT);
pinMode(IN2,OUTPUT);
}
void loop() {
move_forward();
Serial.println("motor is moving Forward");
delay(2000);
stop_motor();
move_backward();
Serial.println("motor is moving Backward");
delay(2000);
stop_motor();
}
How to control speed and direction of dc motor with L293d:
Hope you find this code is very useful and you learn new tricks for controlling speed and direstions of dc motors with arduino.
If you have any query for controlling dc motors please comment.
There will be much more lessons so click follow button.
Marcadores:
Arduino,
Mechatronics,
Sensors/Modules
Related Posts
Subscribe to:
Post Comments (Atom)


No comments:
Post a Comment