/ Saturday, 18 February 2017 / No comments / Arduino
Led blinking with Arduino
Hello everyone in my previous post you found how Arduino is important in our projects. Now i am going to show you that how to make interesting projects with Arduino. Life is full of lights and brightness so its cool if we start our Controller with LED blink and then leads to multiple leds with Arduino.
Arduino Led Blinking:
Its fun to start Arduino programming with blink led and its also very easy way to start with simple program. If you don't have any idea about programming you haven't to be careful about it because when i started using Arduino i had just a very little idea about programming and then i started from led blinking and i found Arduino very interesting and simple.Now i can make any difficult projects with Arduino. Believe me if you come up with my posts sequentially you may became master of Arduino.
Components:
For getting started with arduino we must have to know about the components we use. We must have an Arduino i am using Arduino uno if you have another board Arduino mega or nano or anyone you can use it. The best thing is that the programming will be same for all arduino boards.You need 1-resistor and an led of any color and a bread board and some jumper wires for our practical work.
Here is the list of components :
- Arduino uno.
- 1 led.
- 1 resistor 220ohm.
- 1 bread board.
- 2 jumper wires.
Blinking led circuit:
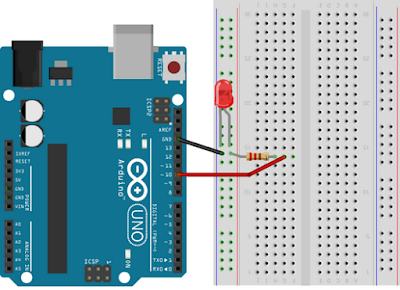
If you want to lit an external LED with this sketch. Firstly you have to put your LED positive side with resistor and then connect the resistor second leg with Arduino pin 10 which are shown with Red wire. The negative side of led connect with Ground (which is shown in circuit with black wire).
NOTE that resistor is must be connected otherwise your led will blow out because Arduino gives 5 VOLT in every pin and led is working maximum 2.5 or 3 volt if the voltage is more then 2.5 or 3 volt led will blow out. After making the circuit Be warned, it will NOT do anything until you have uploaded the code to the board.
Led blinking Code:
int led=10;
void setup() {
pinMode (led,OUTPUT);
}
void loop()
{
digitalWrite(led,1)
delay(1000);
digitalWrite(led,0);
delay(1000);
}
Understanding of code (led blinking code):
first of all in the top we must describe the variable whose name is led and it is an integer (int) and also define the pin number where we want to program and want to get our output.int led=10;
now come to the setup where we define our pin mode that our led is OUTPUT or INPUT of-course in our case the led is OUTPUT because its shows us blinking and we are making this code to output led blinking.
void setup() {
pinMode (led,OUTPUT);
}
Now come to the loop where we define those terms which will run every time again and again. Here we define that what will happen to our output that it will ON or it will OFF you can told this ON and OFF by using HIGH, LOW, 1 or 0 by writing the command of digital write. Digital means the pin number we are using is a digital that's why we use digital and write on it that we are writing on our led high or low. Here i use 1 or 0 instead of HIGH and LOW.
void loop() {
digitalWrite(led,1); //led ON
delay(1000); // this is for delay second in arduino time is in milliseconds so 1000ms is 1sec.
digitalWrite(led,0); // 0 means led OFF.
delay(1000);
}
For blinking the builtin led "L" of pin 13. The only change in code is replace int led=10; with int led=13; and don't put any resistor or wires.Note- if the Arduino is unplugged, then plugged in again, it will still work.
Hope you enjoyed the lesson, keep looking at my profile for more arduino lessons soon.
Related Posts
Subscribe to:
Post Comments (Atom)


No comments:
Post a Comment